As a special education inclusion teacher, I have had the
opportunity to work as a co-teacher in over 20 different classrooms. I have
been so lucky to work with so many wonderful teachers with great ideas not
just for lessons, but classroom management as well.
opportunity to work as a co-teacher in over 20 different classrooms. I have
been so lucky to work with so many wonderful teachers with great ideas not
just for lessons, but classroom management as well.
For this post, I decided to share my 13 favorite classroom
organization tips I have seen. Since I don’t have access to take pictures of the classrooms I have worked in, I have used Pinterest to find similar ideas to
share with you. Here are my favorite classroom organization techniques!
organization tips I have seen. Since I don’t have access to take pictures of the classrooms I have worked in, I have used Pinterest to find similar ideas to
share with you. Here are my favorite classroom organization techniques!
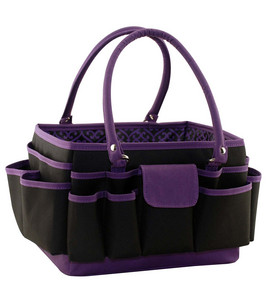
1. Scrapbook Caddy – Mobile Classroom – for Traveling Teachers
As an inclusion teacher, it can be difficult not having access to your own materials. I use one of these great carriers from Joanns (http://www.joann.com/scrap-essentials-mini-purple-black-tote/xprd150553/). I used one of the many 40% off coupons I got in the mail to purchase it. I keep with me: pencils, pens, highlighters, highlighter tape, reading windows/rulers, crayons, markers, sharpies, dry erase markers, dry erase board, scissors, glue, erasers (to give to students), post-its, wikki sticks, and more. It seriously has made my life SO much easier as an inclusion teacher. No more running back to my room to get materials or stealing borrowing from my co-teachers (or students!).
2. Dry Erase Board/Marker/Eraser in a One Bag
This is one of my favorite organizational tips because dry erase boards are great but can become an organizational nightmare. Instead of students gathering multiple items, place them all inside of a gallon ziploc bag. Each ziploc bag should have a dry erase board, marker, and eraser (tissue, sock, eraser, etc). Have bins with extra markers and erasers for when a marker dries out. Remind students to throw away the marker instead of sticking it back in the bin (where another student will just repeat the same process again). I couldn’t find a picture of this set-up but was able to find this example of a toddler busy bag with the same idea except in a pencil case. It’s from The Princess and the Tot.
Ziploc bags are cheaper and bigger so I would still suggest using a gallon ziploc bag (note, they won’t zip close but that’s okay!). They can be placed in a bin standing up to make it easy for students to grab during a lesson.
3. Dice in Tupperware
Kids roll their dice by shaking the container. It must be see-through so they can see what they rolled. Great for preventing dice from rolling across the floor and under things you can’t move. I have seen teachers use tupperware, food containers, etc. This example is from Beyond the Grades, http://beyondthegrades.blogspot.com/search/label/Organization.
4. Cards in Soapboxes
As teachers, we use various types of cards. Soapboxes work great to store cards in. One of my co-teachers uses specific colors for each type of cards (playing cards, math game cards, coin cards, Uno cards, etc). As many of you have experienced, card boxes rip and fall apart. These will last for many years! I found this example from Shady Tree Diary. http://shadytreediary.blogspot.com/2011/04/organization-for-little-things.html
5. Pencil Organization
Don’t underestimate how the sharpening of pencils can disrupt a lesson. It can also cause a lot of teacher frustration. Instead of worrying about stopping your lesson, fill a container with sharpened pencils and have an empty container for students to place pencils that are no longer sharp. I also suggest having a container for extra erasers (large pink erasers, cap erasers don’t work well). Sharpening the pencils is a great class job. It will keep your lessons running smoothly. I normally make sure there are about 20 pencils in the sharpened bucket at the beginning of the day (with some classes, I have found we need even more!) I found this example at, Peace Love and Learning http://peacelovelearning.blogspot.com/2011/08/getting-crafty.html. She even shares free labels!
6. Table Supply Organization
One of my favorite co-teachers does not allow students to keep supplies in their desk. All supplies go into a shared caddy in the middle of the table. It helps create an atmosphere of sharing and team work. I got this example from Fairy Dust Teaching. It is almost identical to my co-teachers set-up. http://fairydustteaching.blogspot.com/2011/11/keep-it-clean.html
7. Weekly Bins
This is one of my favorite organizational tips for new teachers. Have a bin for each day of the week (and one for next week/future activities). Put all of you worksheets and materials inside of the bins the Friday before so that you are ready for the next week. No more searching for a worksheet you know you copied and put down somewhere. You can use a drawer system like the one above from Controlling my Chaos, http://www.controllingmychaos.com/2011/09/vinyl-crazy.html. Or you can use large open bins or baskets which allow you to hold more materials.
8. Construction Paper
As a student teacher, I saw another teacher do this and immediately knew I was going to steal the idea. Use the bottom drawer of a file cabinet or a file box to organize construction paper by color. No more mess when students try to pull a specific color out of a pile. You can also quickly see when you are out of a certain color. This example is from Two Things in Common, http://twothingsincommon.blogspot.ca/2011/01/teacher-tips-on-snow-day.html.
9, New Student Pack
I saw a teacher do this my first year working in an Elementary school. As she set up her classroom for the new school year, she had large ziploc bags with New Student written on them. Over the next week, she filled the bags with copies of the materials she sent home. She also included a blank desk tag, sign in tag, blank job tag, etc. This way when a new student came, she was not scrambling to get materials together. The student also felt included because they didn’t have different tags for everything. This example is again from Two Things in Common.
10. Mailbox Clips
This is a great example on how to label mailboxes. Instead of writing the name and covering it year after year (which causes the mailboxes to become messy looking), use a binder clip. You can place the students name on the end of the binder clip (or number as pictured above). Then you can just replace the clips or label on the clips each year. This example is from Mrs. Wheeler’s First Grade. http://mrswheelerfirst.blogspot.com/2012/08/classroom-photos_19.html
11. Sub Tub or Binder
Keep a Binder or Tub ready with all of your sub materials. Items could include emergency fire drill list, dismissal list, phone numbers of important people in the school, how to use the phone (if confusing), computer log-in, important notes about students (such as allergies or things to be aware of), etc. Then all you have to do is add in your sub plans for the specific day you’re out. Also, keep emergency sub plans in the back just in case you are unexpectedly out. If you use a tub, you can also place the materials needed for the lesson inside. This example is from One Extra Degree, http://oneextradegree.blogspot.com/2011/04/sub-tub-makeover.html.
12. Take Home Folder
This is an easy way to let parents know what needs to come back to school and what can stay home. At our school we say: Left – L side – Leave at Home and Right – R side – Return to School. Kids learn quickly and will ask you which side a paper should go on. This example is from Trendy Teacher at http://trendyteacher.wordpress.com/themes/.
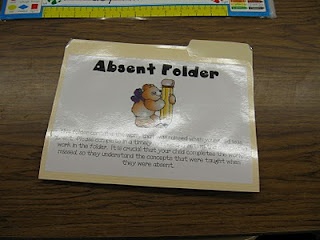
13. Absent Folder
This is a really easy way to gather materials for an absent student. Place an absent folder on their desk and when students pass out papers for a lesson, they should make sure to put one in the absent folder. This makes it really easy to know what an absent student has missed. No more scrambling to gather materials from the recycle bin the next day. This example is from What the Teacher Wants, http://whattheteacherwants.blogspot.com/2011/01/management-monday_17.html.


