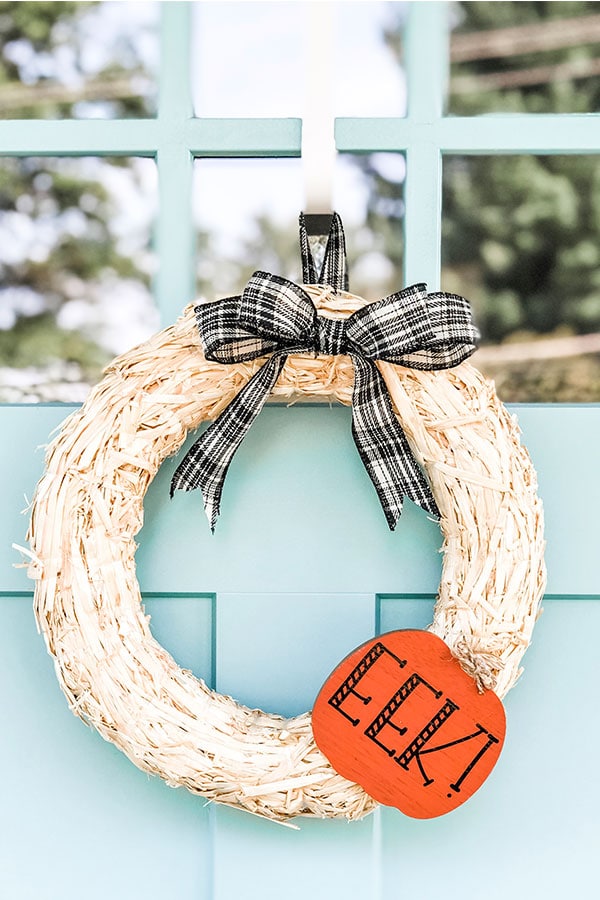
This easy and inexpensive Halloween Wreath is the perfect fall DIY project to add a little ghoulish charm to your front door. The best kind of holiday crafts are the ones that don’t cost a ton of money and take just a little bit of time.
Full Video Tutorial of DIY Halloween Wreath
If you want to see a full-length video tutorial of how to create the wreath, click here to check it out on youtube.
Where to Get the Materials Inexpensively
Amazon is one of my favorite places to shop BUT it will cost you a lot more. For my products, I shopped locally. Make sure to use coupons and watch for sales. I also love to purchase products on sale at the end of the season on clearance and save them for the next year. I got my wreath 80% off from Spring Clearance.
- Pumpkin cut out – Target’s Dollar Spot
- Ribbon – Michaels, Joanns, or Hobby Lobby **with a coupon!!
- Wreath – Michaels and Joanns both sell the wreaths super cheap (less than $5. I got mine 80% off from another season).
How Do You get the Words?
I used my Silhouette machine to cut the words out using vinyl. You can paint them on but I chose to use vinyl. If you’re considering a machine, check out my comparison of a Silhouette vs. Cricut.
Don’t have a cutting machine, no problem! You can use small wood letters from the Dollar Tree or a craft store OR just leave it blank!
As an Amazon Associate, I earn from qualifying purchases. I am also an affiliate for the HP ink program. Click here to read more.

Easy and Inexpensive Halloween Wreath DIY
Learn how to make this easy and inexpensive Halloween Wreath. Free SVG & Silhouette files included!
Materials
- straw wreath
- wood cut out pumpkin (I got mine from Target)
- 651 vinyl
- ribbon
- twine (if using a Target pumpkin with a string/hole)
- paint (if desired)
Tools
- hot glue
- hot glue gun
- transfer tape
- scissors
- weeding tool
- vinyl applicator
Instructions
See the full video tutorial on youtube.
- Paint one side of your wood cutout (if desired).
- Let it dry.
- Cut and weed the vinyl design (files included below).
- Transfer vinyl to the wood cut out.
- Hot glue the back of the wood cut out to the lower corner of the wreath.
- If using a Target pumpkin that has a hole at the top, cut the string off.
- Tie a small twine bow and hot glue it over the hole on the pumpkin.
- Cut a 6-inch piece of ribbon.
- Tie it at one end.
- Glue the tied end to the back, the center of the wreath to create a loop to hang the wreath.
Create the Bow for the Top
- Cut the following size pieces of ribbon: 2 x 18 inch long, 1 x 15 inch long. 1 x 4 inch long.
- Take an 18-inch piece of ribbon and create a loop.
- Use hot-glue to secure one end of the loop to the other.
- Repeat creating a loop with the 15-inch piece of ribbon.
- Place the large loop flat on a surface with the hot glued center in the back, touching the surface.
- Put a little hot glue in the center of the larger loop.
- Place the smaller loop (glued side down) on top of the large loop. You want the nicer side of the loop to be facing towards you.
- Use the 4-inch piece of ribbon to create the center of the bow.
- Flip the two loops upside down.
- Put the 4-inch ribbon around the two loops in the center to cinch the bow together.
- On the backside, slip in the other 18-inch piece of ribbon to create the tail. Make sure it's even on both sides.
- Wrap the 4-inch piece around the center of the bow and glue at the end on the backside to secure the end (if the end doesn't fall on the backside, trim to make sure it does).
- Cut a triangle into both ends of the tail, making them approximately the same length.
- Glue the finished bow in the top center of the wreath.
Recommended Products
As an Amazon Associate and member of other affiliate programs, I earn from qualifying purchases.


File Use Information
These files are for personal use only and may not be used commercially in any way. This includes but is not limited to: sharing the direct files anywhere including within a Facebook group or social media, creating products to sell using these SVGs and prints, using the file as an image on social media, etc. If you are unsure of your intended use, contact me. You may share one image from this post and share a link to the post without permission.